Hi developers, Hope everyone is doing well and safe in this pandemic. Today I am going to tell that how we can implement the Registration and Login functionality into ASP.NET MVC using Entity Framework with IDE Visual Studio 2019. Trust me, it’s a very simple way to implement, you only need to follow the steps as below mentioned, So, without wasting the time, Let’s Start…
Scope:
- Implement the FormsAuthentication
- Implement the RemoteValidation
- Authorization Filters
- Do not accept duplication record
- Register a new user
- Login functionality
Steps:
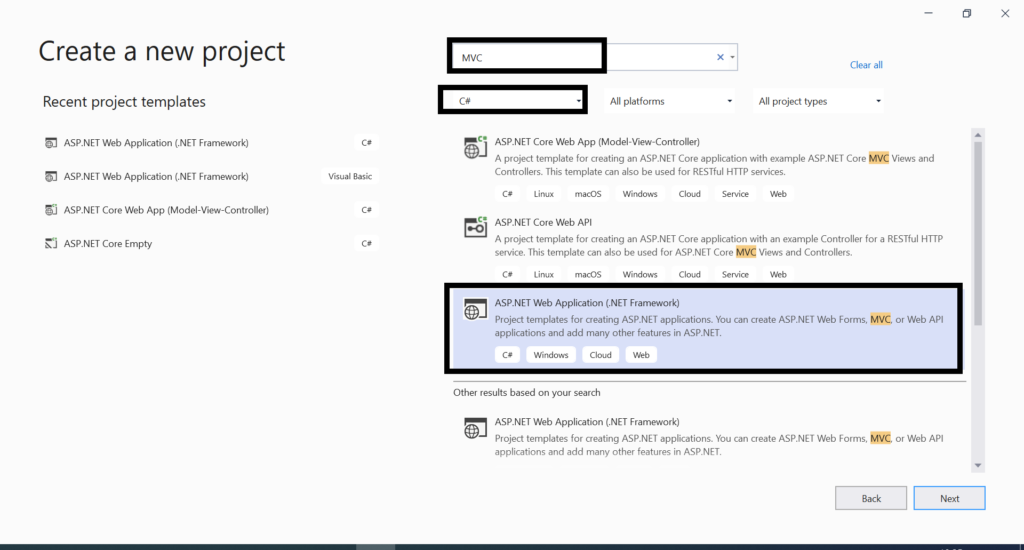
- Open the Visual Studio 2019 and create a new project as below.
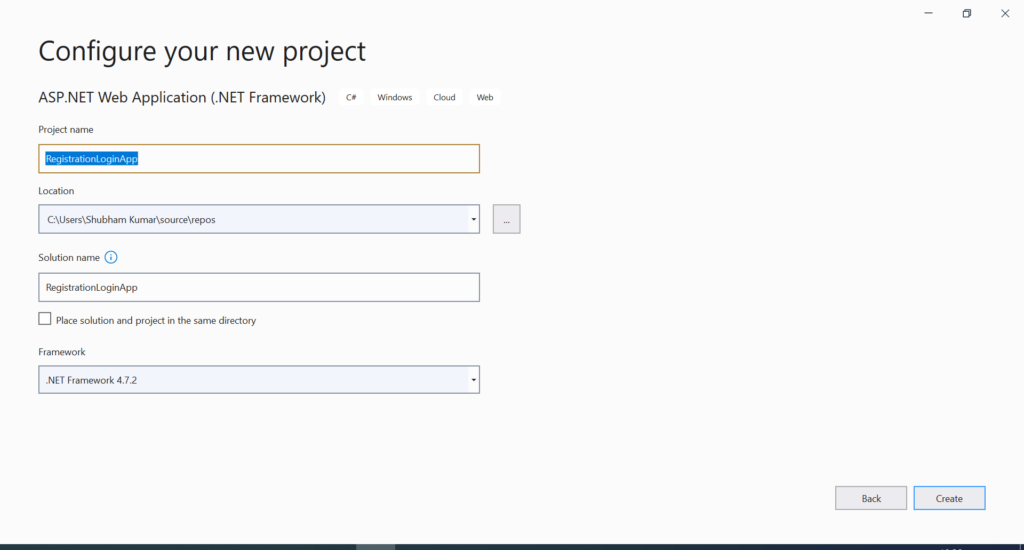
- Name your project as you want, select the location and .Net Framework as below snapshot.
- Select MVC and uncheck the HTTPS and click on Create button.

We can see our new brand web application is ready as below.

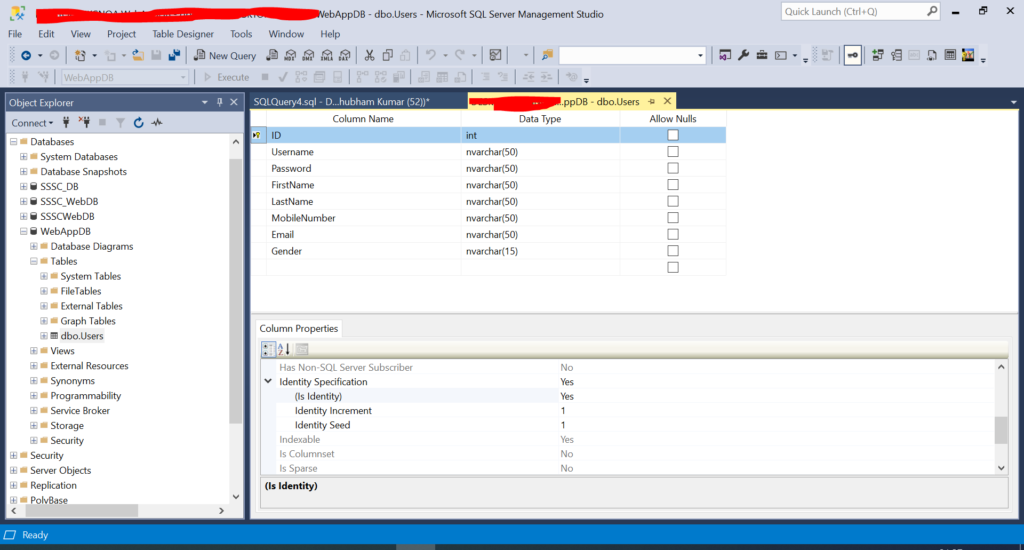
- I would like tell that here we are going to implement the Registration and Login functionality, so I will create a database named “WebAppDB” and will create a table named “Users”. We are going to use only one table “Users” for both Registration and Login functionality. Now let’s move to SQL Server Management Studio and finish the Database task.
Note:
I have created the table Users and added the column as you can see in the above snapshot. I set the ID column as Primary Key and set it as Auto-incremented Property.
Now our database and project both are ready to start the development.
- Now let’s move to Visual Studio and add our Entity Data Model under the Models folder. To add an entity data model, please right click on Models folder and Go to Add and click on ADO.Net Entity Data Model as below screenshot.

It will show a pop-up and give a name for your Entity Model as below.

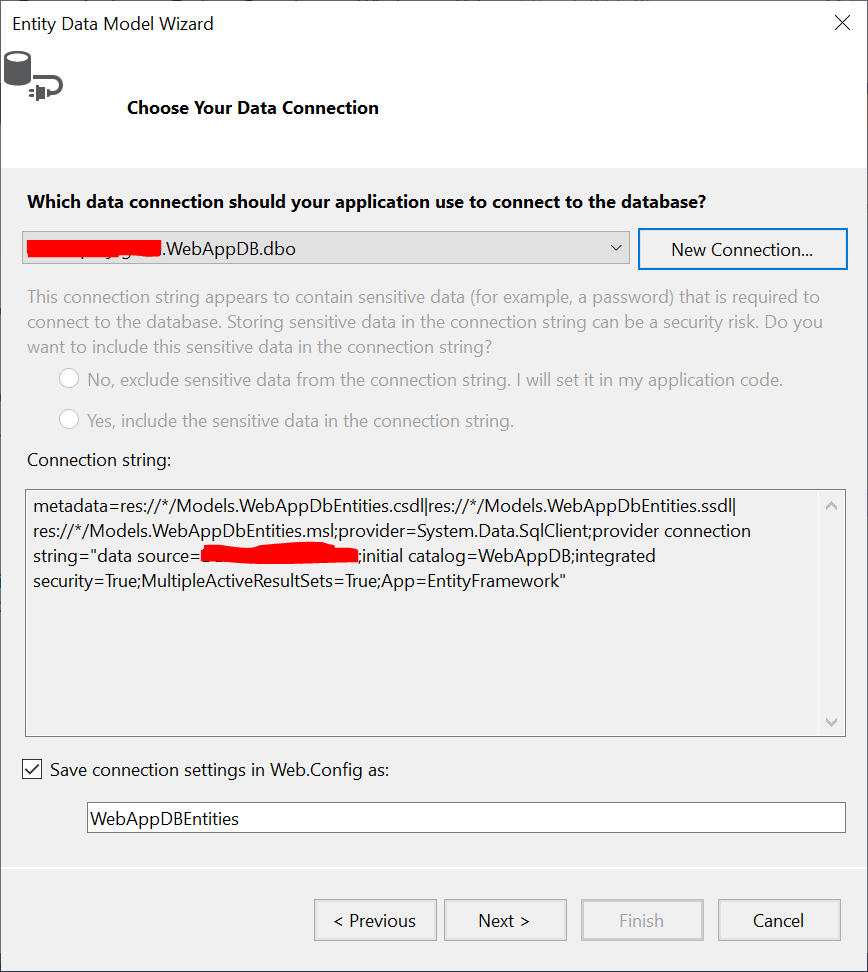
Now Select EF Designer from the database and click on the Next button.

Now Click on New Connection and enter your server’s name, select the Authentication, and select your Database. I have configured the Data connection as below.
Once you clicked on next, select the Entity Framework 6.x and click on the Next button as below.

Now select your table and click on the Finish as below.

We have successfully added our Data Entity Model into our project. You can see this in the below snapshot.

- Let’s add one class under the Models and name it UsersViewModel.

public class UsersViewModel
    {
        public int ID { get; set; }

        [Required]
        [Display(Name = "Username")]
        [Remote("IsUserNameAvailable", "Account", ErrorMessage = "Username Already Exist")]
        public string Username { get; set; }

        [Required]
        [Display(Name = "First Name")]
        public string FirstName { get; set; }

        [Required]
        [Display(Name = "Last Name")]
        public string LastName { get; set; }

        [Required]
        [Remote("IsMobileAvailable", "Account", ErrorMessage = "Mobile Number Already Exist")]
        [RegularExpression(@"^([0-9]{10})$", ErrorMessage = "Invalid Mobile Number.")]
        [Display(Name = "Mobile Number")]
        public int MobileNumber { get; set; }

        [Required]
        [Remote("IsEmailAvailable", "Account", ErrorMessage = "Email Id Already Exist")]
        [Display(Name = "Email ID")]
        [RegularExpression(@"^([\w.-]+)@([\w-]+)((.(\w){2,3})+)$", ErrorMessage = "E-mail is not valid")]
        public string Email { get; set; }

        [Required]
        [Display(Name = "Gender")]
        public string Gender { get; set; }

        [Required]
        [Display(Name = "Password")]
        [DataType(DataType.Password)]
        public string Password { get; set; }
}- First add an Attribute into our HomeController as below. It means, only authorized person can access this controller. It’s all about FormsAuthentication.

- To enable the form authentication into our application, just add the below code into Web.config file.
<system.web>
    <compilation debug="true" targetFramework="4.7.2" />
    <httpRuntime targetFramework="4.7.2" />
	  <authentication mode="Forms">
		  <forms loginUrl="Account/Login"></forms>

	  </authentication>
</system.web>- Let’s add an AccountController under the Controllers folder.
Now we will write the code into AccountController to Register a new user.
using RegistrationLoginApp.Models;
using System;
using System.Collections.Generic;
using System.Linq;
using System.Web;
using System.Web.Mvc;

namespace RegistrationLoginApp.Controllers
{
    public class AccountController : Controller
    {
        private WebAppDBEntities dBEntities = new WebAppDBEntities();
        // GET: Account
        public ActionResult Index()
        {
            return View();
        }

        public ActionResult Register()
        {
            return View();
        }

        [HttpPost]
        public ActionResult Register(UsersViewModel userVM)
        {
            User model = new User();
            if (ModelState.IsValid)
            {
                model.Username = userVM.Username;
                model.FirstName = userVM.FirstName;
                model.LastName = userVM.LastName;
                model.MobileNumber = userVM.MobileNumber;
                model.Password = userVM.Password;
                model.Email = userVM.Email;
                model.Gender = userVM.Gender;

                dBEntities.Users.Add(model);
                dBEntities.SaveChanges();
            }
            return RedirectToAction("Login");
        }
    }
}
I have implemented the Remote Validation for Username, Email ID, and Mobile Number. The below method will check these records are already exists or not.
        public JsonResult IsUserNameAvailable(string UserName)
        {
            return Json(!dBEntities.Users.Any(u => u.Username == UserName), JsonRequestBehavior.AllowGet);
        }

        public JsonResult IsEmailAvailable(string Email)
        {
            return Json(!dBEntities.Users.Any(u => u.Email == Email), JsonRequestBehavior.AllowGet);
        }

        public JsonResult IsMobileAvailable(string MobileNumber)
        {
            return Json(!dBEntities.Users.Any(u => u.MobileNumber == MobileNumber), JsonRequestBehavior.AllowGet);
        }
Now let’s add a view for Register by following the below snapshot.

Now Let’s add a new class and name it LoginVM under the Models folder.
using System;
using System.Collections.Generic;
using System.ComponentModel.DataAnnotations;
using System.Linq;
using System.Web;

namespace RegistrationLoginApp.Models
{
    public class LoginVM
    {
        [Required]

        public string Username { get; set; }

        [Required]
        [DataType(DataType.Password)]
        public string Password { get; set; }
    }
}
Let’s write code for Login functionality.
public ActionResult Login()
        {
            return View();
        }

        [HttpPost]
        public ActionResult Login(LoginVM model)
        {
            bool isValid = dBEntities.Users.Any(u => u.Username == model.Username && u.Password == model.Password);
            if (isValid)
            {

                FormsAuthentication.SetAuthCookie(model.Username, false);
                return RedirectToAction("Index", "Home");
            }

            ModelState.AddModelError("", "Invalid Username/Password!");
            return View();
        }
Please add the Login view as we added for Register. You can see my below views for Register and log in both.
Login.cshtml
@model RegistrationLoginApp.Models.LoginVM

@{
    ViewBag.Title = "Login";
    Layout = "~/Views/Shared/_Layout.cshtml";
}

<h2>Login</h2>


@using (Html.BeginForm())
{
    @Html.AntiForgeryToken()

    <div class="form-horizontal">

        @Html.ValidationSummary(true, "", new { @class = "text-danger" })
        <div class="form-group">
            @Html.LabelFor(model => model.Username, htmlAttributes: new { @class = "control-label col-md-2" })
            <div class="col-md-10">
                @Html.EditorFor(model => model.Username, new { htmlAttributes = new { @class = "form-control" } })
                @Html.ValidationMessageFor(model => model.Username, "", new { @class = "text-danger" })
            </div>
        </div>

        <div class="form-group">
            @Html.LabelFor(model => model.Password, htmlAttributes: new { @class = "control-label col-md-2" })
            <div class="col-md-10">
                @Html.EditorFor(model => model.Password, new { htmlAttributes = new { @class = "form-control" } })
                @Html.ValidationMessageFor(model => model.Password, "", new { @class = "text-danger" })
            </div>
        </div>

        <div class="form-group">
            <div class="col-md-offset-2 col-md-10">
                @Html.ActionLink("Register", "Register", null, new { @class = "btn btn-primary mt-2" })
                <input type="submit" value="Login" class="btn btn-success" />
            </div>
        </div>
    </div>
}

@*<div>
    @Html.ActionLink("Back to List", "Index")
</div>*@

@section Scripts {
    @Scripts.Render("~/bundles/jqueryval")
}
Register.cshtml
@model RegistrationLoginApp.Models.UsersViewModel

@{
    ViewBag.Title = "Register";
    Layout = "~/Views/Shared/_Layout.cshtml";
}

<h2>Register a new user</h2>


@using (Html.BeginForm())
{
    @Html.AntiForgeryToken()

    <div class="form-horizontal">

        @Html.ValidationSummary(true, "", new { @class = "text-danger" })
        <div class="form-group">
            @Html.LabelFor(model => model.Username, htmlAttributes: new { @class = "control-label col-md-2" })
            <div class="col-md-10">
                @Html.EditorFor(model => model.Username, new { htmlAttributes = new { @class = "form-control" } })
                @Html.ValidationMessageFor(model => model.Username, "", new { @class = "text-danger" })
            </div>
        </div>

        <div class="form-group">
            @Html.LabelFor(model => model.FirstName, htmlAttributes: new { @class = "control-label col-md-2" })
            <div class="col-md-10">
                @Html.EditorFor(model => model.FirstName, new { htmlAttributes = new { @class = "form-control" } })
                @Html.ValidationMessageFor(model => model.FirstName, "", new { @class = "text-danger" })
            </div>
        </div>

        <div class="form-group">
            @Html.LabelFor(model => model.LastName, htmlAttributes: new { @class = "control-label col-md-2" })
            <div class="col-md-10">
                @Html.EditorFor(model => model.LastName, new { htmlAttributes = new { @class = "form-control" } })
                @Html.ValidationMessageFor(model => model.LastName, "", new { @class = "text-danger" })
            </div>
        </div>

        <div class="form-group">
            @Html.LabelFor(model => model.MobileNumber, htmlAttributes: new { @class = "control-label col-md-2" })
            <div class="col-md-10">
                @Html.EditorFor(model => model.MobileNumber, new { htmlAttributes = new { @class = "form-control" } })
                @Html.ValidationMessageFor(model => model.MobileNumber, "", new { @class = "text-danger" })
            </div>
        </div>

        <div class="form-group">
            @Html.LabelFor(model => model.Email, htmlAttributes: new { @class = "control-label col-md-2" })
            <div class="col-md-10">
                @Html.EditorFor(model => model.Email, new { htmlAttributes = new { @class = "form-control" } })
                @Html.ValidationMessageFor(model => model.Email, "", new { @class = "text-danger" })
            </div>
        </div>

        <div class="form-group">
            @Html.LabelFor(model => model.Gender, htmlAttributes: new { @class = "control-label col-md-2" })
            <div class="col-md-10">
                @Html.EditorFor(model => model.Gender, new { htmlAttributes = new { @class = "form-control" } })
                @Html.ValidationMessageFor(model => model.Gender, "", new { @class = "text-danger" })
            </div>
        </div>

        <div class="form-group">
            @Html.LabelFor(model => model.Password, htmlAttributes: new { @class = "control-label col-md-2" })
            <div class="col-md-10">
                @Html.EditorFor(model => model.Password, new { htmlAttributes = new { @class = "form-control" } })
                @Html.ValidationMessageFor(model => model.Password, "", new { @class = "text-danger" })
            </div>
        </div>

        <div class="form-group">
            <div class="col-md-offset-2 col-md-10">
                @Html.ActionLink("Login", "Login", null, new { @class = "btn btn-primary mt-2" })
                <input type="submit" value="Register" class="btn btn-success" />
            </div>
        </div>
    </div>
}

@*<div>
    @Html.ActionLink("Click to Login", "Login")
</div>*@

@section Scripts {
    @Scripts.Render("~/bundles/jqueryval")
}
Now we will write code for Logout. Please add the below method for Logout in AccoutController.
 public ActionResult Logout()
        {
            FormsAuthentication.SignOut();
            return RedirectToAction("Login");
        }
We need to do some changes to our _Layout page. Please replace the as below code.
<div class="navbar-collapse collapse">
                <ul class="nav navbar-nav">
                    <li>@Html.ActionLink("Home", "Index", "Home")</li>
                    <li>@Html.ActionLink("About", "About", "Home")</li>
                    <li>@Html.ActionLink("Contact", "Contact", "Home")</li>

                    @if (User.Identity.IsAuthenticated)
                    {
                        <li><a>Hello @User.Identity.Name</a></li>
                        <li>@Html.ActionLink("Logout", "Logout", "Account")</li>
                    }
                    else
                    {
                        <li>@Html.ActionLink("Login", "Login", "Account")</li>
                    }
                </ul>
            </div>
Congratulations! We have completed our coding part. now it’s time to test the Application.
Let’s start with Register to a new user.

As I clicked on Register it added a new record to our Database as below snapshot.

Note: I am not using any encryption for Passwords.
And you cannot directly access the Home, About, and Contact page. You have to log in first otherwise you will be redirected to the Login page by default.
What’s new in Windows 11? Brief About Windows 11 New Features
Let’s try to register a new user with as same details to check our remote validation.

As you can see above it shows the error and states we have already recorded the details with the same Username, Mobile Number, and Email Id into our database. It means our remote validation is working fine.
Now let’s try to log in.

Congratulation!!! We have successfully logged into our Application.
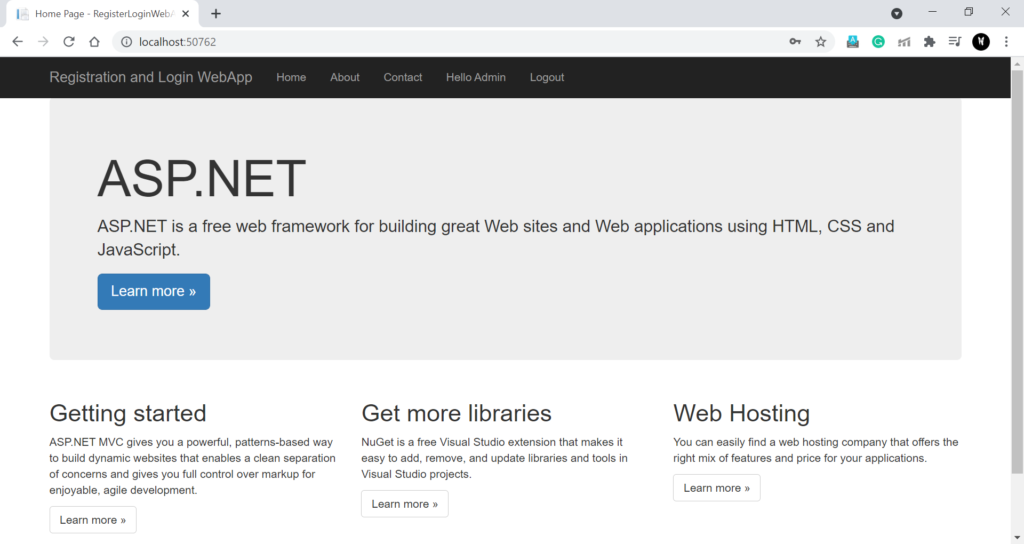
And we can see the Hello Admin and Login/Logout as we coded in _Layout Page

Please see the following screenshots for your reference.

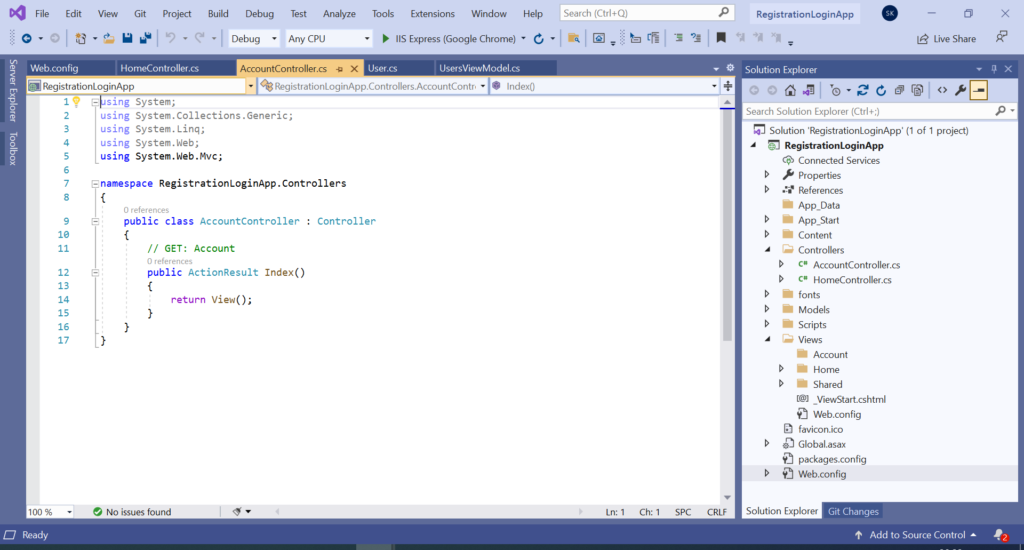
AccountController

HomeController

Please comment if you have any queries.
You can find the code on GitHub repository–> https://github.com/ErShubhamKGupta/RegistrationLoginApp
Happy Coding :)!